40 Days of Kubernetes
What is it?
This is a 40 days of Kubernetes lecture series from Certified Kubernetes Administrator Full Course For beginners.
Day-01 : Docker Fundamentals
What is Docker?
Docker is a platform that lets developers package applications and all their dependencies into lightweight, portable units called containers. This ensures that the application will run the same way on different machines—whether it’s your laptop, a server, or the cloud.
Imagine a world where "It works on my machine!" is no longer a problem.
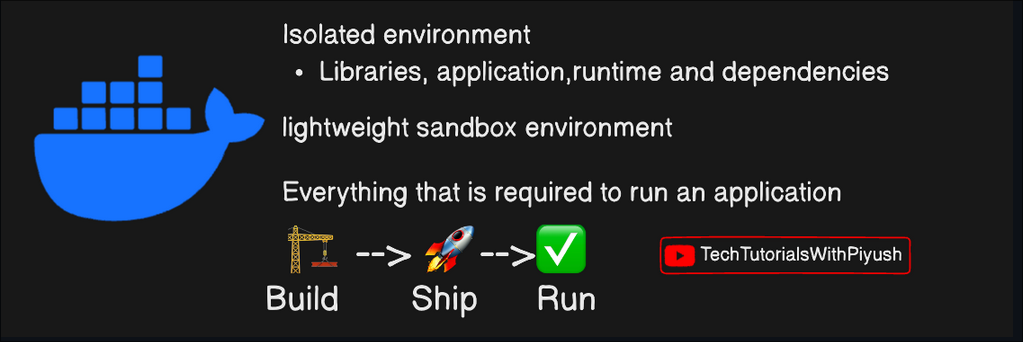
Layman Terms 😅
Let’s think of this way — you finished a website and wanted to test on multiple systems, but the issue is you have developed the project for you system which contains windows as basic OS. Now someone with Linux as operating system wants to test this and gets dependency errors. This occurs because windows and linux are two completely different operating systems fulfilling different purposes. To solve this error docker containers are invented which stores all the dependencies, files, packages and everything.
Why use Containers?
This container maintains each and every requirement in itself removing the need of any external packages to be installed, which removes the conflicts between project packages and system packages.
Benefits:
- No matter what is you OS and system configuration, project runs smoothly and consistent.
- Containers also don’t use higher resources like virtual machines. In the below image it can been seen that, VM has all the dependencies globally which may be different from one app to other committing conflicts.
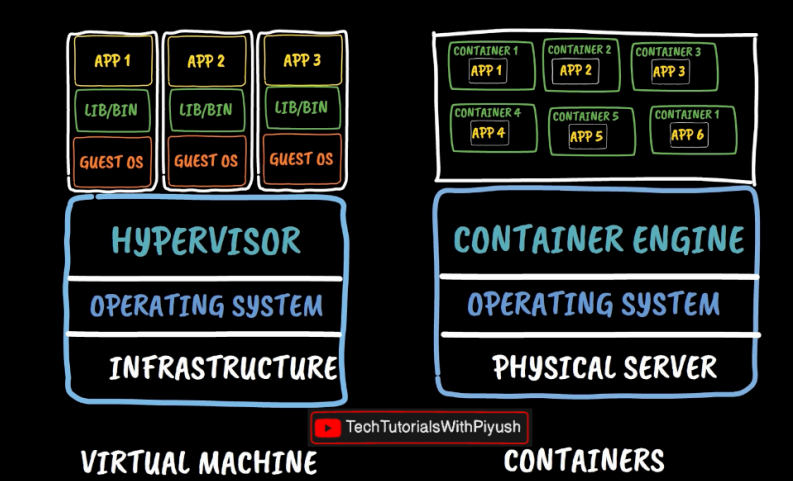
- Each container runs independently and does not conflicts with other system and docker packages.
Core Docker Concepts
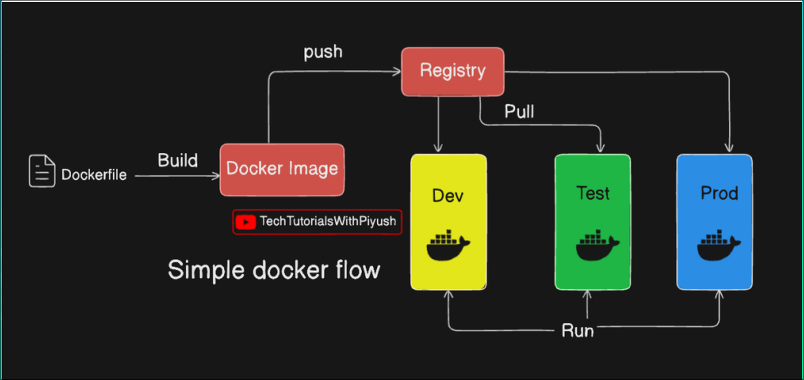
- Docker Image: Think of it as a blueprint for your app which is directly stored in dockerhub(Cloud). These can be now started into multiple instances using containers based on our usage.
- Docker Container: A running instance of the image. Which means out entire application starts running by installing dependencies into this container and we can start the app from this container.
- Dockerfile: A script to create custom Docker images. It contains all the details regarding the requirements and setup with some execution commands. This can be then build and start the app as shown in the below image.
- Docker Hub: A cloud repository to store and share images.
Essential Docker Commands - docker cheatsheet.pdf
-
Run a container:
docker run <image-name>
Example:docker run hello-world -
Build an image:
docker build -t <image-name> . -
List running containers:
docker ps -
Stop a container:
docker stop <container-id> -
Remove a container:
docker rm <container-id>
And numerous more commands are available in docker, that’s why it is very flexible and useful - Get Started | Docker.
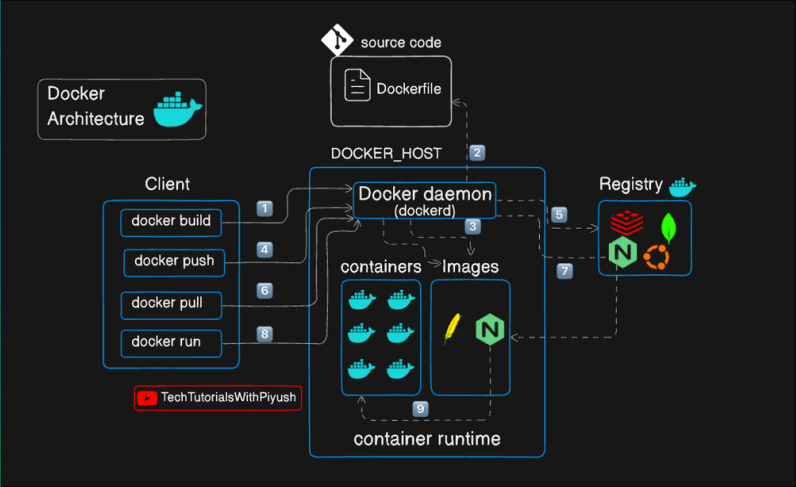
As seen in the above picture, it is just an architecture of a single image, similarly every container has this same structure with its own requirements and purposes.
Day-02 : How to Dockerize your project
Prerequisites
To get started with Docker and Kubernetes, you can use the following sandbox environments: (If you want to do it online without installing into your local system)
Alternatively, download the Docker desktop client for your operating system from the official website:

Step 1: Clone a Sample Project
You can use an existing project for this demo or clone a sample repository. To clone the repository:
git clone https://github.com/docker/getting-started-app.git
Navigate to the project directory:
cd getting-started-app/
Step 2: Create a Dockerfile
A Dockerfile is a text file that contains instructions to create a Docker image for your application.
-
Create an empty file named
Dockerfile:touch Dockerfile -
Open the file with a text editor of your choice and paste the following content:
FROM node:18-alpine
WORKDIR /app
COPY . .
RUN yarn install --production
CMD ["node", "src/index.js"]
EXPOSE 3000
Explanation of the Dockerfile
-
FROM: Specifies the base image (Node.js version 18 on Alpine Linux).
-
WORKDIR: Sets the working directory inside the container.
-
COPY: Copies the project files into the container.
-
RUN: Installs dependencies in production mode using Yarn.
-
CMD: Defines the command to run when the container starts (launching the app).
-
EXPOSE: Specifies the port the app listens on (3000 in this case).
Step 3: Build the Docker Image
Build the Docker image using the docker build command:
docker build -t day02-todo .
Here, -t day02-todo assigns a name to the image.
Verify the image was created successfully:
docker images
Step 4: Push the Image to Docker Hub
-
Log in to your Docker Hub account:
docker login -
Tag the image with your Docker Hub username and repository name:
docker tag day02-todo:latest username/new-reponame:tagname -
Push the image to your Docker Hub repository:
docker push username/new-reponame:tagname
Step 5: Pull and Run the Image
To use the image in another environment:
-
Pull the image:
docker pull username/new-reponame:tagname -
Run the container:
docker run -dp 3000:3000 username/new-reponame:tagname
The -d flag runs the container in detached mode (in the background), and -p maps port 3000 on your machine to port 3000 in the container.
Step 6: Test the Application
Access your app in a browser by navigating to:
http://localhost:3000
If everything is set up correctly, your app should be up and running!
Step 7: Useful Docker Commands
-
Access the container shell:
docker exec -it containername sh # Or using container ID: docker exec -it containerid sh -
View logs:
docker logs containername # Or using container ID: docker logs containerid -
List running containers:
docker ps -
Stop a container:
docker stop containername
This is how we can dockerize our project…
Day-03 : Multi Stage Docker Build
Even though we used Alpine image as base which is very lightweight, still we are getting a huge image size. To reduce this multi stage build is used…
Step 1: Clone the Sample Project
To demonstrate multi-stage builds, clone a sample repository or use any existing web application.
git clone https://github.com/piyushsachdeva/todoapp-docker.git
Navigate into the project directory:
cd todoapp-docker/
Step 2: Create a Dockerfile
-
Create an empty file named
Dockerfile:touch Dockerfile -
Open the file in a text editor and paste the following content:
FROM node:18-alpine AS installer
WORKDIR /app
COPY package*.json ./
RUN npm install
COPY . .
RUN npm run build

FROM nginx:latest AS deployer
COPY --from=installer /app/build /usr/share/nginx/html
Explanation of the Dockerfile
-
Stage 1 (
**installer**):-
Uses Node.js to install dependencies and build the application.
-
npm run buildcompiles the app into a production-ready format.
-
-
Stage 2 (
**deployer**):-
Uses Nginx to serve the built files.
-
Copies the build artifacts from the first stage into Nginx’s default web directory.
-
Step 3: Build the Docker Image
Build the Docker image using the docker build command:
docker build -t todoapp-docker .
Verify the image was created successfully:
docker images
Step 4: Push the Image to Docker Hub
-
Log in to your Docker Hub account:
docker login -
Tag the image with your Docker Hub username and repository name:
docker tag todoapp-docker:latest username/new-reponame:tagname -
Push the image to your Docker Hub repository:
docker push username/new-reponame:tagname
Step 5: Deploy and Test the Image
-
Pull the image on another environment:
docker pull username/new-reponame:tagname -
Run the container:
docker run -dp 3000:80 username/new-reponame:tagname
Verify the Application
-
Open a browser and navigate to:
http://localhost:3000
Your app should now be running!
Step 6: Useful Docker Commands
Access the Container
docker exec -it containername sh
# Or using container ID:
docker exec -it containerid sh
View Logs
docker logs containername
# Or using container ID:
docker logs containerid
Inspect Container Details
docker inspect containername
Clean Up Old Docker Images
docker image rm image-id
After implementing all these steps you can notice reduction in size…
Day-04 : What is Kubernetes?
Why not Docker & What’s the problem?
Suppose you have an application containing 2 container (yeah very small application to be said), but what if one of your container failed due to build issues or bugs, what if your application is globally used. Then you have to maintain a 24/7 team to fill all the issues and maintain the application which is very hectic right? For a small application it seems bit troublesome, then think about an enterprise application containing 100’s of containers😎.
What if you base virtual OS which is used to build your application crashes? What if… what if… what if… yeah yeah there are a lot of what if’s right 😂… I got it.
To solve these issues and maintain some automation things we are using Kubernetes.
What kind of problems we can solve using Kubernetes
Well well, we can solve a lot of problems like:
-
Automated Scaling: Kubernetes scales applications dynamically based on demand using Horizontal Pod Autoscalers.
-
Self-Healing: Automatically restarts failed containers, replaces unhealthy nodes, and ensures application uptime.
-
Service Discovery and Load Balancing: Manages networking between containers and provides built-in load balancing for services.
-
Resource Management: Optimizes resource usage by distributing workloads efficiently across nodes.
-
Centralized Monitoring and Logging: Integrates with tools like Prometheus, Grafana, and Fluentd for better observability.
-
Simplified Deployments: Supports rolling updates, rollbacks, and declarative configuration management.
Not only these, there are lots of uses with it. Ahhh please dont think docker as a villain, but it just limits the possibilities which can be solved by Kubernetes.
When to use Kubernetes?
-
Microservices Architecture: Ideal for managing and scaling applications with multiple loosely coupled services.
-
High Availability: Ensures minimal downtime with self-healing and replication.
-
CI/CD Pipelines: Automates deployments and integrates with DevOps tools for seamless workflows.
-
Multi-Cloud or Hybrid Deployments: Offers flexibility to run workloads across different cloud providers or on-premise.
-
Dynamic Workloads: Excellent for applications with variable resource demands or unpredictable traffic.
When not use Kubernetes?
What the **… is there a situation where we can’t use Kubernetes!!! Well yes, there are some conditions where using Kubernetes is not a better practice. Like :
-
Small Applications: Overhead may be too high for simple, single-container apps.
-
Tight Budgets: Kubernetes’ complexity may incur higher operational and infrastructure costs.
-
Short-Lived Projects: Setting up and managing K8s may not be worth it for temporary applications.
-
Legacy Systems: May not be suitable for monolithic or non-containerized applications.
-
Low Skill Availability: Requires expertise; a lack of skilled team members can lead to mismanagement.
So yeah, this is some kind of introduction about Kubernetes.
Day-05: Kubernetes Architecture
Let’s dive into Kubernetes architecture but not very deep. We have to understand the compobnents first.
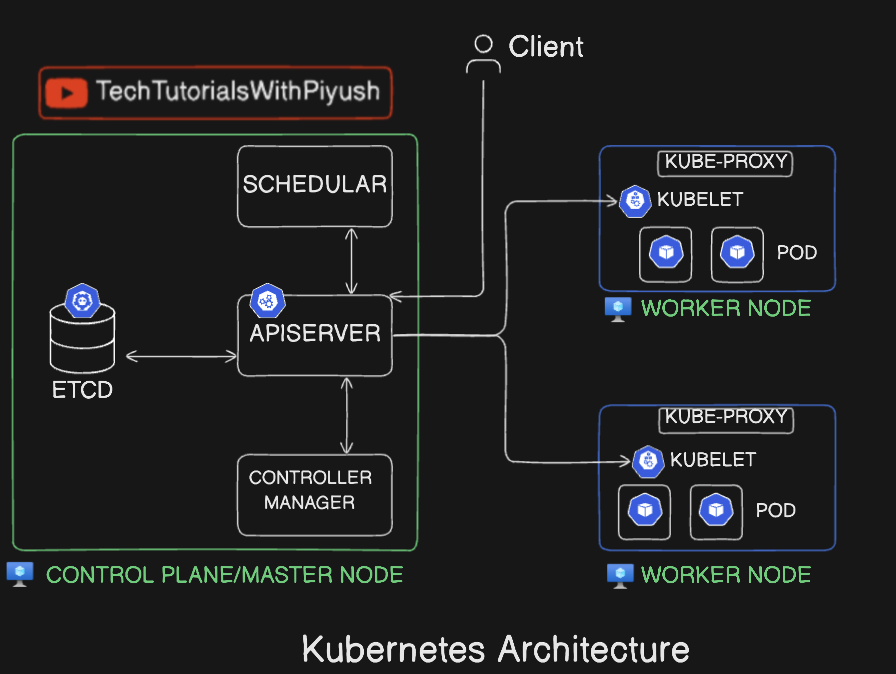
Here we can see 2 different components
- CONTROL/MASTER NODE
- WORKER NODE
The master node is the main component and backend component of a Kubernetes application which contains the operational and administration tasks, and the worker node contains workloads and tasks to be performed. Each of these contains multiple components, and each of its components has their own significance. Let’s deep dive in 😃:
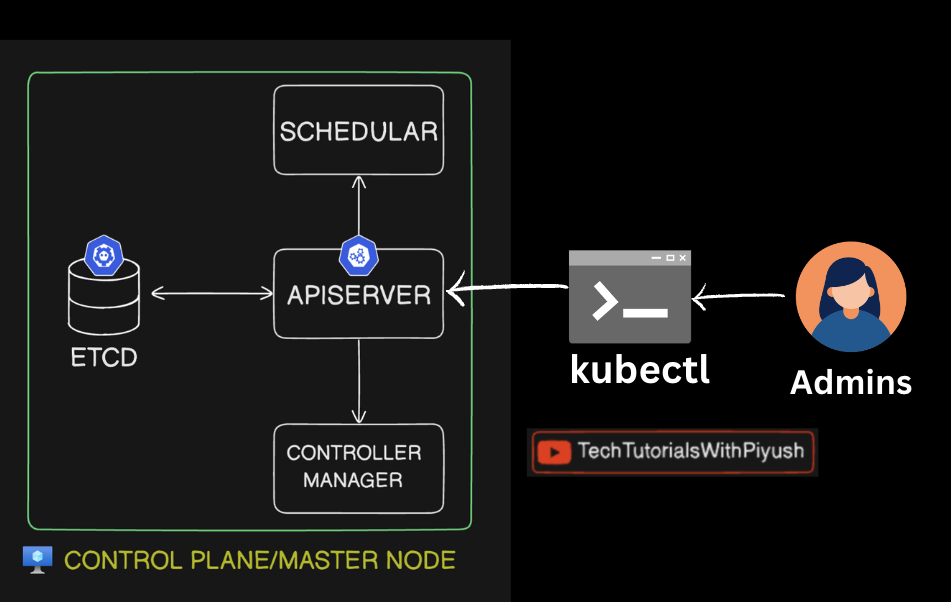
🌐 Kubernetes API Server: The Cluster’s Gateway
The API Server is the heart of Kubernetes, acting as the primary interface for all cluster operations. It processes requests from users, internal components, and external systems, ensuring the cluster operates smoothly and securely.
🚀 Key Roles and Responsibilities
-
Central Communication Hub:
- Serves as the single point of interaction for cluster management.
- Handles requests from
kubectl, dashboards, and automated systems.
-
Authentication and Authorization:
- Verifies who you are (authentication) and what you’re allowed to do (authorization).
-
Validation:
- Ensures incoming requests are correctly structured and logical.
-
Persistence:
- Stores and retrieves the cluster’s state in etcd, maintaining a single source of truth.
-
Cluster State Management:
- Manages the desired and current states of the cluster resources.
-
Real-Time Monitoring:
- Supports “watch” requests, enabling clients to track resource changes in real time.
-
Load Balancing and High Availability:
- Distributes requests across multiple API Servers in high-availability setups.
🔄 API Server Workflow
-
Receive Request:
- Processes requests from
kubectl, external apps, or other components.
- Processes requests from
-
Authentication:
- Validates the requester using tokens, certificates, or plugins.
-
Authorization:
- Checks permissions via RBAC or other authorization mechanisms.
-
Admission Control:
- Applies policies like resource quotas and security constraints.
-
Validation:
- Ensures requests conform to the API schema.
-
Persistence and Update:
- Updates etcd for any state changes and notifies relevant components.
-
Response:
- Returns the result (e.g., resource details or operation status).
✨ Features of the API Server
-
RESTful Interface:
- Offers a RESTful API for seamless programmatic interaction.
-
Extensibility:
- Supports Custom Resource Definitions (CRDs) to extend Kubernetes functionality.
-
Scalability:
- Handles high request volumes efficiently in large clusters.
-
Self-Healing:
- Works with controllers and the scheduler to maintain cluster health.
🌟 Example Scenarios
-
Pod Deployment:
- A
kubectl applycommand sends a request to the API Server, which validates and stores the Pod’s configuration in etcd.
- A
-
Cluster Monitoring:
- A monitoring system uses the “watch” feature to get real-time updates on resource changes.
-
Security Enforcement:
- The API Server ensures only authorized users can modify critical resources.
🛡️ Best Practices
- Monitor Traffic: Use tools like
kube-apiservermetrics to analyze request patterns. - Secure Communications: Enforce TLS and authenticate using secure tokens or certificates.
- Optimize RBAC: Regularly review and refine Role-Based Access Controls.
- Scale API Servers: Add replicas in high-traffic environments for improved performance.
⚡ Kubernetes Scheduler: The Cluster Matchmaker
The scheduler is a vital part of Kubernetes’ control plane, responsible for assigning Pods to the most suitable worker nodes. It ensures optimal resource utilization and enforces scheduling policies to maintain a balanced and efficient cluster.
🚀 Key Functions of the Scheduler
-
Node Selection:
- Chooses the best node for a Pod based on resource availability, constraints, and affinity rules.
-
Resource Awareness:
- Ensures nodes have enough CPU, memory, and other resources to run the Pod.
-
Policy Enforcement:
- Implements policies like:
- Node Affinity/Anti-Affinity: Determines co-location or separation of Pods.
- Taints and Tolerations: Matches Pods with compatible nodes.
- Pod Affinity/Anti-Affinity: Governs scheduling relative to other Pods.
- Implements policies like:
-
Priority and Preemption:
- Honors Pod priorities and may preempt lower-priority Pods for higher-priority workloads.
-
Topology Awareness:
- Considers zones and regions to ensure fault tolerance and reduce latency.
🔄 Workflow of the Scheduler
-
Input:
- Identifies Pods that need scheduling (no assigned node).
-
Filtering:
- Eliminates unsuitable nodes based on:
- Node conditions (e.g., memory pressure, disk issues).
- Resource requests vs. available capacity.
- Policies like taints, tolerations, and affinity rules.
- Eliminates unsuitable nodes based on:
-
Scoring:
- Scores remaining nodes by evaluating factors like:
- Resource balance.
- Pod affinity and anti-affinity preferences.
- Scores remaining nodes by evaluating factors like:
-
Binding:
- Assigns the Pod to the highest-scoring node and updates the API Server.
🛠 Extensibility
The Kubernetes Scheduler is highly customizable:
-
Custom Schedulers:
- Create a scheduler tailored to specific needs.
-
Scheduling Framework:
- Use plugins for custom filtering, scoring, or additional scheduling logic.
🌟 Example Scenarios
-
Resource Constraints:
- A Pod requesting 4 CPUs and 8GB memory is scheduled to a node with adequate resources.
-
Affinity Rules:
- A Pod with Node Affinity is placed on a preferred node (e.g., in a specific zone).
-
Priority Handling:
- A high-priority Pod preempts a low-priority Pod when resources are scarce.
🛡️ Best Practices
- Monitor scheduler performance and logs for bottlenecks or errors.
- Use taints and tolerations to optimize resource usage.
- Implement custom plugins for unique scheduling requirements.
- Regularly review Pod priorities to ensure critical workloads are prioritized.
🗝️ etcd: The Backbone of Kubernetes
etcd is Kubernetes’ key-value store and the source of truth for cluster data. It’s distributed, highly available, and ensures data consistency.
LAYMAN 😁 : Generally it is a database to store the values, but its specialty is to store in JSON(key: value) format which helps to make custom keys for custom values unlike in the RDBMS we have to specify a key for every value.
🚀 What Makes etcd Special?
-
Strong Consistency:
Uses the Raft consensus algorithm for consistent data across nodes. -
High Availability:
Distributed design ensures no single point of failure. -
Durable:
Data is persisted to disk, surviving restarts or failures. -
Low Latency:
Optimized for real-time cluster state updates. -
Scalable:
Handles high request volumes, perfect for large clusters.
🛠 Role of etcd in Kubernetes
-
Cluster State Storage:
Stores everything: Nodes, Pods, ConfigMaps, Secrets, CRDs, etc. -
Leader Election:
Helps control plane components elect a leader (e.g., Scheduler). -
Watch Mechanism:
Enables components to react instantly to state changes. -
Backup & Restore:
Critical for disaster recovery.
🔍 How etcd Works
-
Key-Value Store:
Stores data like:- Key:
/registry/pods/default/my-pod - Value: Pod’s JSON/YAML configuration.
- Key:
-
API Server Interaction:
- API Server writes state to etcd.
- Other components read from it and act.
-
Replication & Consensus:
- Data is replicated across nodes.
- Writes go to the leader; followers stay in sync.
🔒 Deployment Tips
-
HA Setup:
- Use 3 or 5 nodes for quorum-based fault tolerance.
-
Secure Communication:
- Encrypt traffic with TLS.
-
Fast Storage:
- Use SSDs for performance.
-
Regular Backups:
- Tools:
etcdctl, Kubernetes backup mechanisms.
- Tools:
🌟 Best Practices
- Monitor health: Disk latency, memory, and leader elections.
- Regular updates to avoid vulnerabilities.
- Secure access with strong authentication.
⚙️ Kubernetes Controller Manager
The Controller Manager ensures Kubernetes runs like a well-oiled machine! It coordinates controllers to maintain the cluster’s desired state.
🧩 Key Roles
-
State Reconciliation:
Keeps the actual state aligned with the desired state (e.g., reschedules crashed Pods). -
Controller Aggregation:
Combines multiple controllers into a single process for simplicity. -
Resource Management:
Automates tasks like scaling, scheduling, and repairs.
🛠 Controllers Overview
-
Node Controller:
Handles node health and reschedules Pods from failed nodes. -
Replication Controller:
Ensures the desired number of Pod replicas are running. -
Deployment Controller:
Manages rollouts, updates, and rollbacks of Deployments. -
DaemonSet Controller:
Ensures a Pod copy runs on all/specific nodes. -
Job Controller:
Ensures Pods complete tasks for Jobs. -
Endpoint Controller:
Updates IP addresses for Services. -
Service Account Controller:
Manages default ServiceAccounts and their secrets. -
Resource Quota Controller:
Enforces resource usage limits in namespaces. -
PV Controller:
Manages Persistent Volumes and bindings to PVCs.
🔄 Workflow of the Controller Manager
-
Watch:
Monitors desired state via API Server. -
Reconcile:
Fixes mismatches (e.g., recreates deleted Pods). -
Update State:
Updates the cluster state and persists changes in etcd.
🔑 Features
- Leader Election: Ensures only one active instance in HA setups.
- Modularity: Independent controllers simplify debugging.
- Extendability: Add custom controllers for specialized tasks.
🌟 Example Scenarios
-
Node Failure:
Node Controller detects a failure, marks it “NotReady,” and reschedules Pods. -
Replica Management:
If a Pod in a Deployment crashes, the Replication Controller creates a new one. -
Resource Binding:
The PV Controller binds a PVC to an available PV.
🛠 Best Practices
- Monitor Logs: Ensure controllers are functioning properly.
- Enable Leader Election: Avoid conflicts in HA setups.
- Develop Custom Controllers: Extend Kubernetes for unique workflows.
🚀 Worker Node in Kubernetes
A Worker Node is where your apps live and thrive in Kubernetes! It’s the powerhouse that runs Pods, hosts containers, and manages resources. Let’s break it down!
🧩 Key Components
-
Kubelet:
- The worker node’s brain!
- Talks to the API server, ensures Pods are running, and reports node status.
-
Container Runtime:
- The engine that runs your containers.
- Examples:
Docker,containerd,CRI-O.
-
Kube-Proxy:
- The networking wizard!
- Routes traffic to/from pods and handles load balancing.
-
Operating System:
- The base for all Kubernetes magic!
- Popular choices: Ubuntu, CentOS, CoreOS.
🎯 Responsibilities
- Host Pods: Runs app workloads.
- Networking: Enables inter-Pod and external communication.
- Monitor Health: Reports resource usage & status.
- Scale & Load Balance: Shares workloads with other nodes.
⚡ Workflow in Action
- Pod Scheduling: Scheduler assigns Pods → Kubelet sets them up.
- Run Containers: Container runtime pulls images and launches containers.
- Allocate Resources: Pods get CPU, memory, etc., as per their needs.
- Networking: Kube-proxy ensures smooth traffic flow.
- Health Check: Kubelet monitors containers and restarts them if needed.
🌟 Features
- Scalable: Add more nodes to handle more workloads.
- Fault-Tolerant: Failing nodes? Pods are rescheduled elsewhere.
- Resource Isolation: Keeps Pods secure using namespaces and groups.
- Smart Resource Management: Efficient and stable resource usage.
🛠 Deployment & Maintenance Tips
- Node Labels & Taints: Organize workloads intelligently (e.g., GPU nodes).
- Monitoring: Use tools like Prometheus/Grafana for insights.
- Upgrades: Keep OS and Kubernetes updated for security and stability.
- Autoscaling: Ensure high availability with auto-scaling and health checks.
💡 Best Practices
- Allocate Sufficient Resources: Avoid bottlenecks.
- Stay Updated: Patch vulnerabilities and improve performance.
- Use Quotas: Prevent Pods from hogging resources.
- Label Nodes: Optimize workload distribution.
Kubernetes Worker Nodes: Simple, Scalable, Powerful! 🛠
Day-06: Kubernetes Local Setup using KIND
Kubernetes local setup is a good idea for practice instead of cloud services. Because in cloud services everything is managed by them, and we don’t even get the complete access to control node. So, for learning and practice for CKA exam purposes it is ideal to install/setup locally. There are lots of ways to install locally such as minikube, k3s, kind etc…, for time being using kind is the best option. It is one of the most popular method for local installation called Kubernetes in docker.
One more important note is that in CKA examination - Below domains and all of its sub-domains are allowed to be referred in the exam, but the thing is we have to know how to search and what to search 😂…
- Kubernetes Documentation | Kubernetes
- Kubernetes Blog | Kubernetes
- Kubernetes cheat sheet : kubectl Quick Reference | Kubernetes
For installation use - kind – Quick Start - Here whole documentation is available. (kubectl Cheat Sheet)
It is also available in arch repo so we can use "paru -S kind"
To start we need to create clusters, for that we have multiple methods like default or multi node cluster creation. But, the basic command is
kind create cluster --image <image_version> --name <name>
Now that we have created clusters, we need to manage them and use them. For that we have to install and test kubectl…
   curl -LO "https://dl.k8s.io/release/$(curl -L -s https://dl.k8s.io/release/stable.txt)/bin/linux/amd64/kubectl"
sudo install -o root -g root -m 0755 kubectl /usr/local/bin/kubectl
There are various commands to run and for documentation visit the official website. After installation to get the available nodes run:
kubectl get nodes
This is the default method to create cluster which only creates control node, but cluster is a mix of control and worker nodes. To create multiple and individual nodes we can pass the YAML file as a parameter.
An example default YAML file - Multi Node Cluster Creation
# a cluster with 3 control-plane nodes and 3 workers
kind: Cluster
apiVersion: kind.x-k8s.io/v1alpha4
nodes:
- role: control-plane
- role: control-plane
- role: control-plane
- role: worker
- role: worker
- role: worker
YAML with more parameters, but above is the default file…
# this config file contains all config fields with comments
# NOTE: this is not a particularly useful config file
kind: Cluster
apiVersion: kind.x-k8s.io/v1alpha4
# patch the generated kubeadm config with some extra settings
kubeadmConfigPatches:
- |
  apiVersion: kubelet.config.k8s.io/v1beta1
  kind: KubeletConfiguration
  evictionHard:
    nodefs.available: "0%"
# patch it further using a JSON 6902 patch
kubeadmConfigPatchesJSON6902:
- group: kubeadm.k8s.io
  version: v1beta3
  kind: ClusterConfiguration
  patch: |
    - op: add
      path: /apiServer/certSANs/-
      value: my-hostname
# 1 control plane node and 3 workers
nodes:
# the control plane node config
- role: control-plane
# the three workers
- role: worker
- role: worker
- role: worker
Now to create multi-node cluster we can use
kind create --image <image_version> --name <name> --config <config yaml file path>
Now if we run again kubectl get nodes we will get three nodes since we created using YAML file which contains multi nodes, because when created it auto switches the context to the new one like in git.
But if we want to check the current context or if we want to change the contexts we can use the commands like
kubectl config get-contexts # shows all the contexts/clusters created with a start mark infront of the current using cluster

# Now to change the cluster we can use
kubectl config use-context <cluster/context name>
These are the basic commands which should be practiced thoroughly since we have to use them very often throughout the test.
Day-07: Kubernetes Notes: Pods and YAML
Pods Overview
-
Pod: Smallest deployable unit in Kubernetes, hosting one or more containers.
-
How Pods Work:
-
User interacts with the Kubernetes API Server using tools like
kubectl. -
API Server schedules the Pod on a worker node.
-
Pod runs on the worker node, hosting the workload.
-
Imperative vs. Declarative Approaches
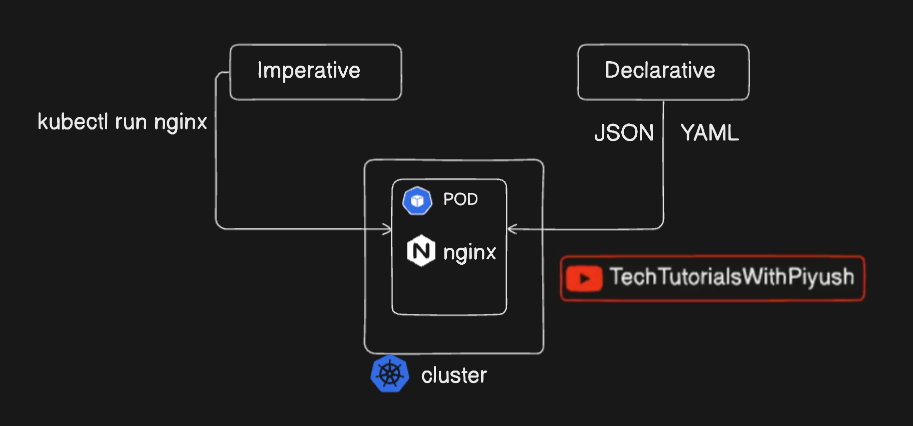
Imperative
-
Direct commands to manage resources.
-
Example:
kubectl run nginx-pod --image=nginx
Declarative
-
Define desired state in a YAML file and apply it.
-
Example:
apiVersion: v1 kind: Pod metadata: name: nginx-pod spec: containers: - name: nginx-container image: nginx ports: - containerPort: 80 -
Apply it:
kubectl apply -f nginx-pod.yaml
YAML Basics
-
Comments: Use
#. -
Key-Value Pairs:
name: example age: 25 -
Lists:
hobbies: - reading - coding -
Nested Data:
address:
  city: Gotham
  zip: 12345
Kubernetes YAML Structure(even tha alphabets should be correct such as caps lock)
-
apiVersion: API version (e.g.,
v1). -
kind: Resource type (e.g.,
Pod). -
metadata: Resource metadata (e.g., name, labels).
-
spec: Configuration details (e.g., containers, images).
Example:
apiVersion: v1
kind: Pod
metadata:
  name: my-pod
  labels:
    app: my-app
spec:
  containers:
  - name: my-container
    image: my-image:latest
    ports:
    - containerPort: 8080
Practical Tips
-
Indentation: Use spaces (not tabs). Be consistent.
-
Generate YAML: Use dry-run:
kubectl run nginx --image=nginx --dry-run=client -o yaml -
Troubleshooting:
-
Check errors:
kubectl describe pod <pod-name> -
Fix directly:
kubectl edit pod <pod-name>
-
Quick Commands
-
Create Pod (Imperative):
kubectl run nginx-pod --image=nginx -
Convert to YAML:
kubectl run nginx-pod --image=nginx --dry-run=client -o yaml > nginx-pod.yaml -
Apply YAML:
kubectl apply -f nginx-pod.yaml -
Describe Pod:
kubectl describe pod nginx-pod -
Get Pod with Details:
kubectl get pods -o wide
Notes for Practice
-
Create a Pod using imperative commands.
-
Generate and edit YAML from an existing Pod.
-
Practice troubleshooting with
kubectl describeandkubectl edit. -
Explore labels and their use in grouping resources.
